Browse by category

Introduction: Why Chemical Hazards Demand a Systematic Approach in Manufacturing
According to the ILO, work-related diseases and injuries cause millions of deaths globally each year, and hazardous substance exposure remains a major contributor in industrial settings. In manufacturing, the risk rarely comes from one dramatic event alone. More often, it builds through routine tasks such as receiving drums, mixing batches, cleaning equipment, or transferring waste.
That is why EHS managers and chemical handlers need a system, not an ad hoc reaction after a spill, odor complaint, or near miss. A chemical hazard in manufacturing can include health risks such as toxicity, burns, and respiratory sensitization, as well as physical risks such as fire, explosion, or violent reaction. If you only look at the substance itself and not the task, quantity, exposure route, and control conditions, you can underestimate the real risk on the shop floor.
This article walks through a practical approach: how to identify chemical hazards, assess risk consistently, control exposure in daily operations, improve storage and handling practices, and finally digitize these workflows for stronger traceability and execution.
What Chemical Hazards Look Like in Manufacturing Environments
Health Hazards vs. Physical Hazards
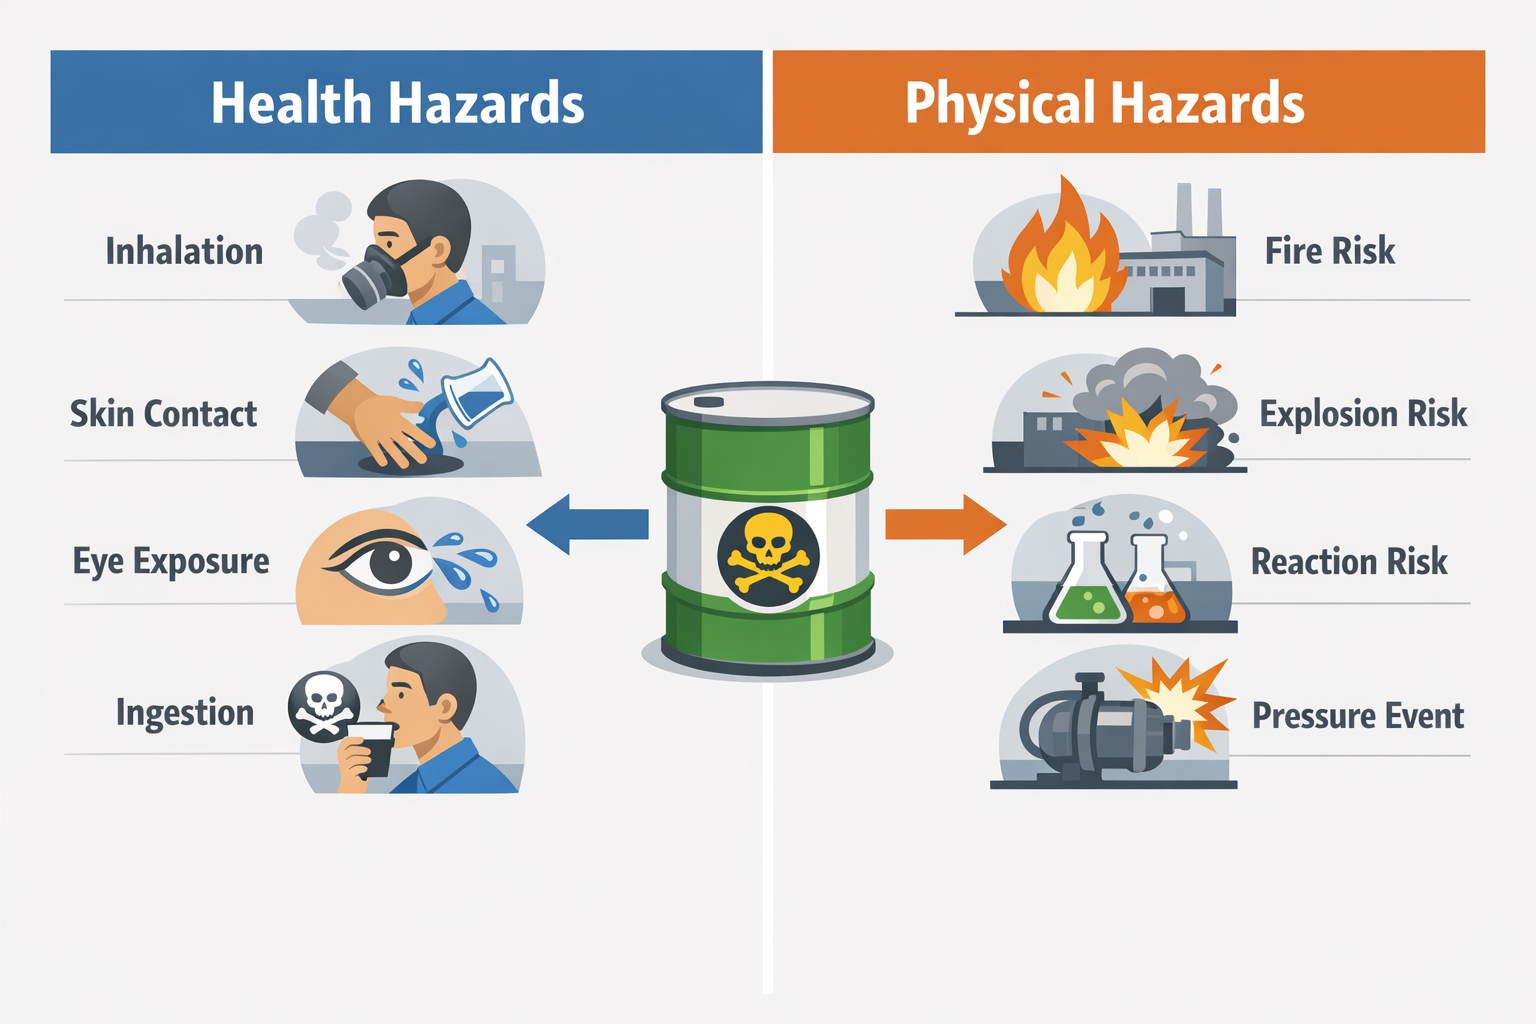
In manufacturing, a chemical hazard usually falls into one of two broad groups: health hazards and physical hazards. Health hazards harm the body through inhalation, skin contact, ingestion, or eye exposure, while physical hazards make fires, explosions, violent reactions, or pressure events more likely. A solvent can be both at once, for example, causing dizziness from vapor exposure while also creating a flash-fire risk.
Toxic, Irritant, and Sensitizing Chemicals
Toxic chemicals can cause acute poisoning, organ damage, or long-term illness even at relatively low exposure levels. In electronics assembly, metal cleaning, and resin-based production, workers may encounter toxic solvents, heavy-metal compounds, or isocyanates during mixing, coating, or equipment cleaning. Irritants are more common than many teams realize, showing up in degreasers, alkaline cleaners, and disinfectants that inflame skin, eyes, or airways after repeated contact. Sensitizers are especially important because once a worker becomes sensitized, even small future exposures can trigger asthma or dermatitis, which is why these substances should be flagged early during any task review.
Corrosive Chemicals in Use and Storage
Corrosives damage tissue on contact and can also attack containers, pumps, flooring, and nearby materials. Acids and caustics are often found in water treatment, metal finishing, CIP sanitation, battery areas, and pH adjustment stations, where splash risk is high during drum changeovers and manual dosing. Receiving is another overlooked point of exposure because damaged containers, loose bungs, or incompatible pallets can create leaks before materials even enter storage. For EHS teams, chemical hazard assessment best practices begin with checking not only the substance itself but also transfer methods, containment conditions, and emergency eyewash access.
Flammable and Reactive Materials
Flammable liquids, combustible dusts, aerosols, and solvent vapors create some of the most severe physical hazards in manufacturing. Typical risk points include solvent storage rooms, ink or paint mixing stations, adhesive application lines, and waste accumulation areas where vapor concentration can build if ventilation is poor. Reactive chemicals bring a different risk: they may polymerize, decompose, release toxic gas, or react violently with water, air, acids, or oxidizers. In maintenance and waste handling, incompatible residues mixed in one container can turn a routine disposal task into a heat, pressure, or fire event.
Where Chemical Hazards Appear Across Operations
Chemical risks rarely stay confined to one room. Receiving may involve unlabeled secondary containers; storage may involve segregation failures; production may expose operators during open pouring, spraying, or heating; and sanitation often uses concentrated cleaning agents at the end of the shift when supervision is lighter. Maintenance teams face additional exposure when opening lines, replacing seals, or clearing blocked pumps, because trapped chemicals can be released unexpectedly. Waste handling is equally critical because partially filled drums, contaminated rags, and spent solvents can combine exposure, ignition, and compliance risks in one location.
Therefore, when identifying hazards, look beyond the product label and focus on the task, the condition, and the point of contact. A corrosive stored correctly may present low day-to-day risk, while a mild irritant used in frequent manual wiping may be the more significant exposure issue. That is why controlling chemical exposure in manufacturing depends on seeing where chemicals are received, moved, opened, mixed, cleaned, and discarded. The next step is to turn these visible hazard types into a repeatable identification process.
How to Identify Chemical Hazards Step by Step
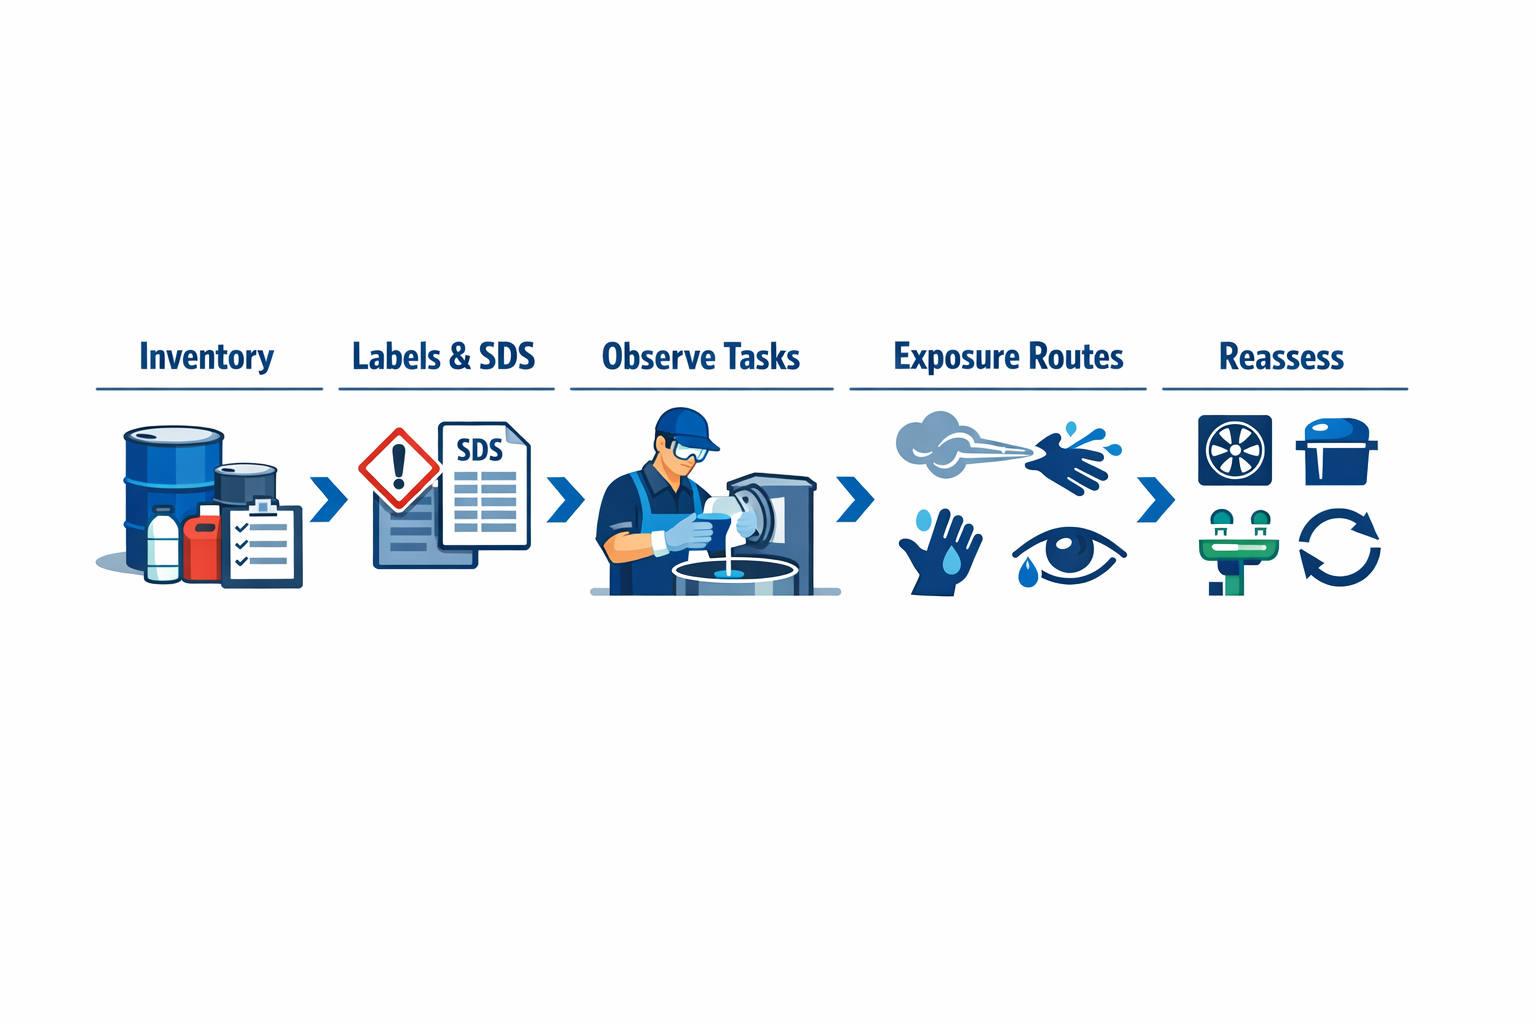
A reliable chemical hazard identification process starts with the job, not just the container. In practice, the most accurate method is sequential: build a chemical inventory, review labels and safety data sheets, observe how the chemical is actually used, map likely exposure routes, and inspect the points where storage and use create added risk. In a paint-mixing room, for example, each step reveals something different about solvent thinners, cleaning agents, and hardeners that may not be obvious from purchasing records alone.
That sequence matters because a chemical can appear low risk on paper but become high risk in use. A thinner stored in sealed drums looks controlled until operators decant it into open buckets, wipe spills with rags, and work near warm equipment for eight hours per shift. If you are asking how to identify chemical hazards effectively, the answer is to connect chemical data with real tasks, real people, and real conditions.
Start With a Complete Chemical Inventory
Begin by listing every chemical present in the area, including raw materials, intermediates, maintenance products, sanitation chemicals, samples, and waste containers. In the paint-mixing room, that means not only pigments and solvents, but also drum-cleaning fluids, adhesive removers, contaminated absorbents, and partially used containers kept near the line. Many plants discover gaps at this stage because chemicals purchased by maintenance or small-volume trial materials are often missing from the main register.
The inventory should capture product name, supplier, quantity, concentration, storage location, process step, and who uses it. This creates the base for later chemical hazard assessment best practices, because you cannot prioritize what you have not fully listed. It also helps prevent one common failure: reviewing only production chemicals while overlooking support chemicals that create equal or higher exposure potential.
Review Labels and Safety Data Sheets
Once the inventory is complete, review every label and safety data sheet for hazard classification, incompatible materials, required controls, and first-aid information. In our mixing room example, the SDS may show that one hardener is a respiratory sensitizer, while the solvent used for cleaning is highly flammable and capable of causing central nervous system effects with repeated exposure. Those are different hazards, and each calls for different attention during identification.
Do not stop at the hazard pictogram or signal word. Sections on exposure controls, storage compatibility, handling precautions, and accidental release often reveal practical risks that operators face daily. If labels are damaged, inconsistent, or written in a language workers do not use confidently, that is already a hazard identification finding.
Observe Tasks, Not Just Chemicals
The next step is task-based observation, which is where hazard identification becomes much more accurate. Watch the full job cycle: receiving, opening, mixing, transfer, cleaning, changeover, and waste collection. In the paint-mixing room, a five-minute drum transfer may create more inhalation and splash risk than hours of closed storage.
Talk to the people doing the work while you observe. Operators often know where splashes happen, which valves drip, which containers are hard to seal, and when odors increase during production peaks. Employee input is one of the most practical chemical hazard assessment best practices because it captures routine deviations that audits often miss.
Map Exposure Routes and Reassess Regularly
After observing the task, map likely exposure routes: inhalation from vapors, skin contact during manual pouring, eye contact from splashes, and incidental ingestion from contaminated gloves or surfaces. This step links directly to controlling chemical exposure in manufacturing later, because the right controls depend on how exposure occurs. In the mixing room, the same solvent may present inhalation risk at the tank opening and skin risk during rag-based cleanup.
Finish by inspecting storage points, transfer stations, ventilation conditions, waste accumulation areas, and emergency equipment near use points. Then reassess whenever there is a formula change, new supplier, incident, layout change, or shift in production volume. Chemical hazard identification is not a one-time review; it is a routine operating discipline.
Chemical Hazard Assessment Best Practices for Prioritizing Risk
Score the Hazard, Not Just the Substance
Once you know how to identify chemical hazards, the next step is deciding which ones need action first. A practical assessment looks beyond the chemical name and asks six questions: how severe the harm could be, how likely exposure is, how often the task happens, how much material is used, how long workers are exposed, and how many people are involved. In our running example, the blending area uses a solvent-based cleaning agent during end-of-shift washdown, so the risk profile depends on the cleaning task, not only the SDS classification.
A simple risk matrix helps EHS teams turn that judgment into a repeatable method. Many plants use a 1–5 score for severity and a 1–5 score for likelihood, then multiply them to rank risk, while adding exposure frequency and worker count as modifiers. For example, a task with high vapor inhalation potential, daily use, and four exposed operators should rank above a more hazardous chemical used once a month in a closed system.
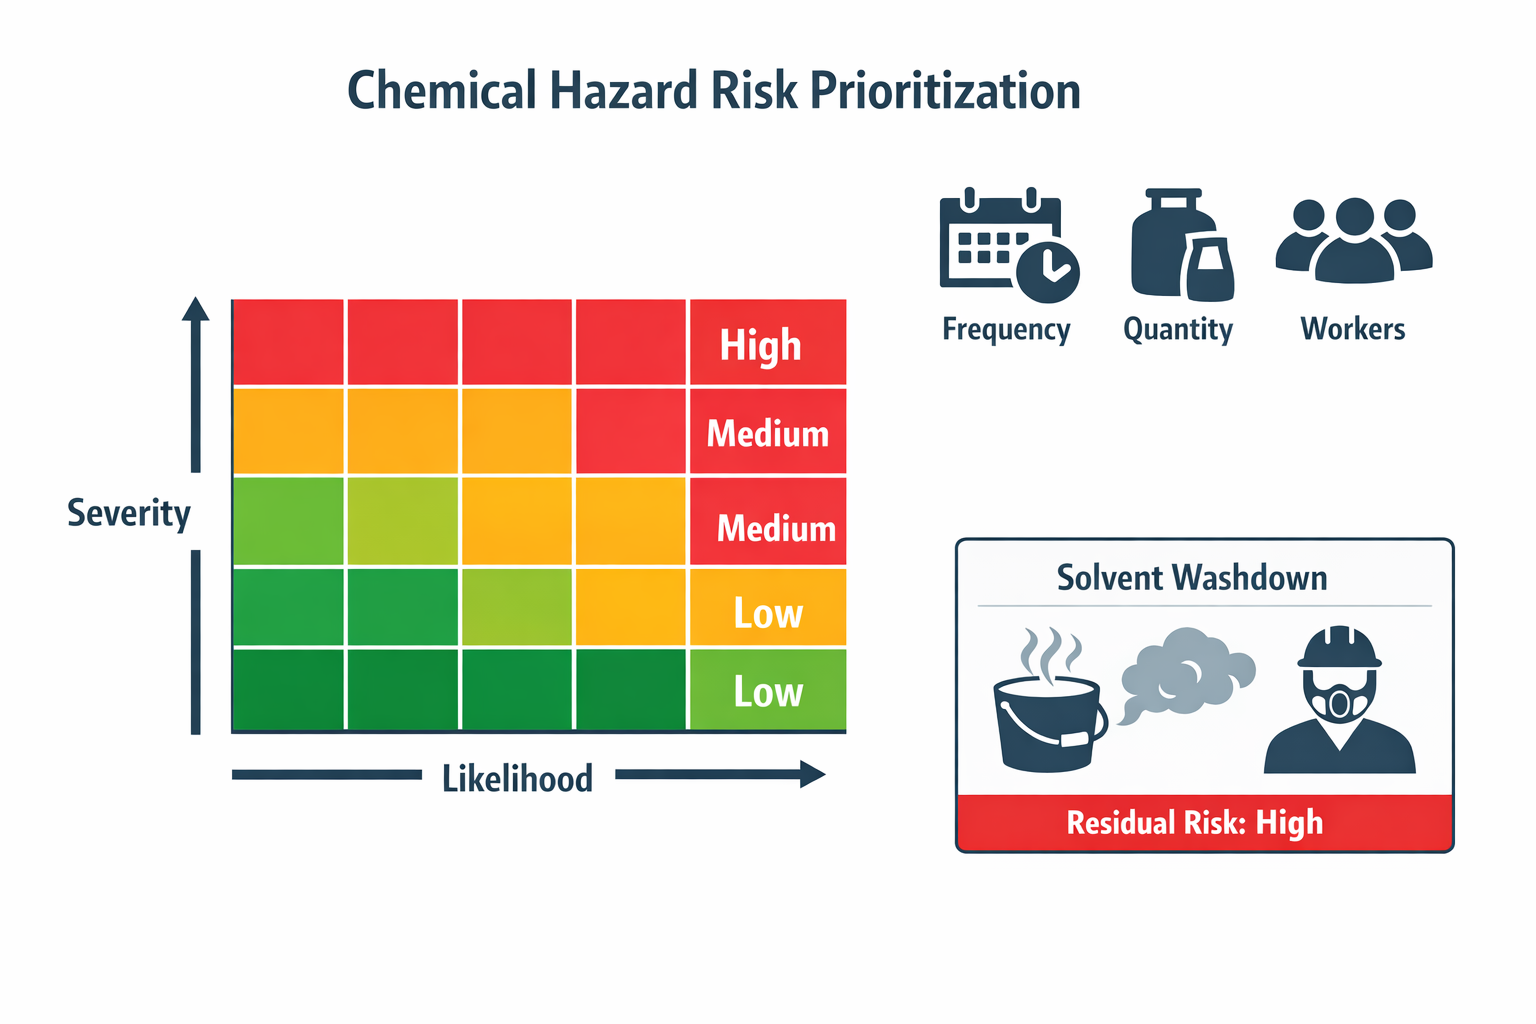
In the blending example, the solvent may score high on severity because it is flammable and can cause dizziness or skin irritation. Likelihood rises because operators manually pour it into open buckets, ventilation is inconsistent, and the task happens every shift. That combination makes the assessment more useful than a generic list of chemical hazards, because it shows where escalation is justified.
Document Existing Controls Before Calling It High Risk
One of the most useful chemical hazard assessment best practices is to record what controls already exist before rating the final risk. In the washdown task, the team notes local exhaust ventilation near the blending line, chemical-resistant gloves, labeled containers, and a written SOP. These controls matter because a hazard with effective controls may need monitoring, while the same hazard with weak execution may need immediate correction.
Identify Gaps That Change the Priority
Assessment should separate inherent risk from residual risk. Inherent risk reflects the solvent’s raw danger, while residual risk reflects the risk that remains after current controls. In this case, residual risk stays elevated because open transfer, uneven PPE use, and poor container closure increase both vapor release and ignition potential.
That gap analysis helps plants prioritize actions that truly reduce exposure instead of only documenting compliance. The blending area may not need a major redesign first; it may need closed transfer containers, a standard glove specification, and supervisor verification during washdown. This is where chemical hazard assessment best practices connect directly to controlling chemical exposure in manufacturing, even though the control methods themselves are addressed in the next section.
Reassess After Process Changes, Supplier Changes, or Incidents
Chemical hazard assessment should never be treated as a one-time file. If the supplier reformulates the cleaner, if production volume increases, or if sanitation shifts move from once per day to three times per day, the original scoring may no longer be valid. Even a small process change can alter vapor generation, contact time, or the number of workers exposed.
Incident learning is equally important. If one operator reports headaches during washdown or a near miss occurs when vapors accumulate near a motor, reassessment should happen immediately rather than at the next annual review. The goal is a live prioritization process that keeps the highest-risk tasks visible and escalates them before they become recordable injuries or fire events.
Controlling Chemical Exposure in Manufacturing Through Storage, Handling, and Response Workflows
After you identify a chemical hazard and rank the risk, the next step is execution on the floor. In practice, controlling chemical exposure in manufacturing means choosing controls that either stop contact from happening or limit the damage if contact occurs. The strongest controls change the process itself, while the weakest depend on workers reacting correctly every time. That distinction matters when you set standards for storage rooms, transfer points, and response procedures.
Apply The Hierarchy Of Controls To Chemical Work
Start with elimination and substitution where possible, such as replacing a high-VOC solvent with a lower-volatility cleaner or buying pre-mixed materials instead of manual blending. If the chemical must stay, engineering controls should do most of the work through local exhaust ventilation, closed transfer lines, bunding, and segregated storage. Administrative controls then define who can handle the material, how tasks are done, and what inspections are required, while PPE sits as the last layer. This aligns with chemical hazard assessment best practices because the highest-risk tasks should be redesigned first, not managed only with gloves and warning signs.
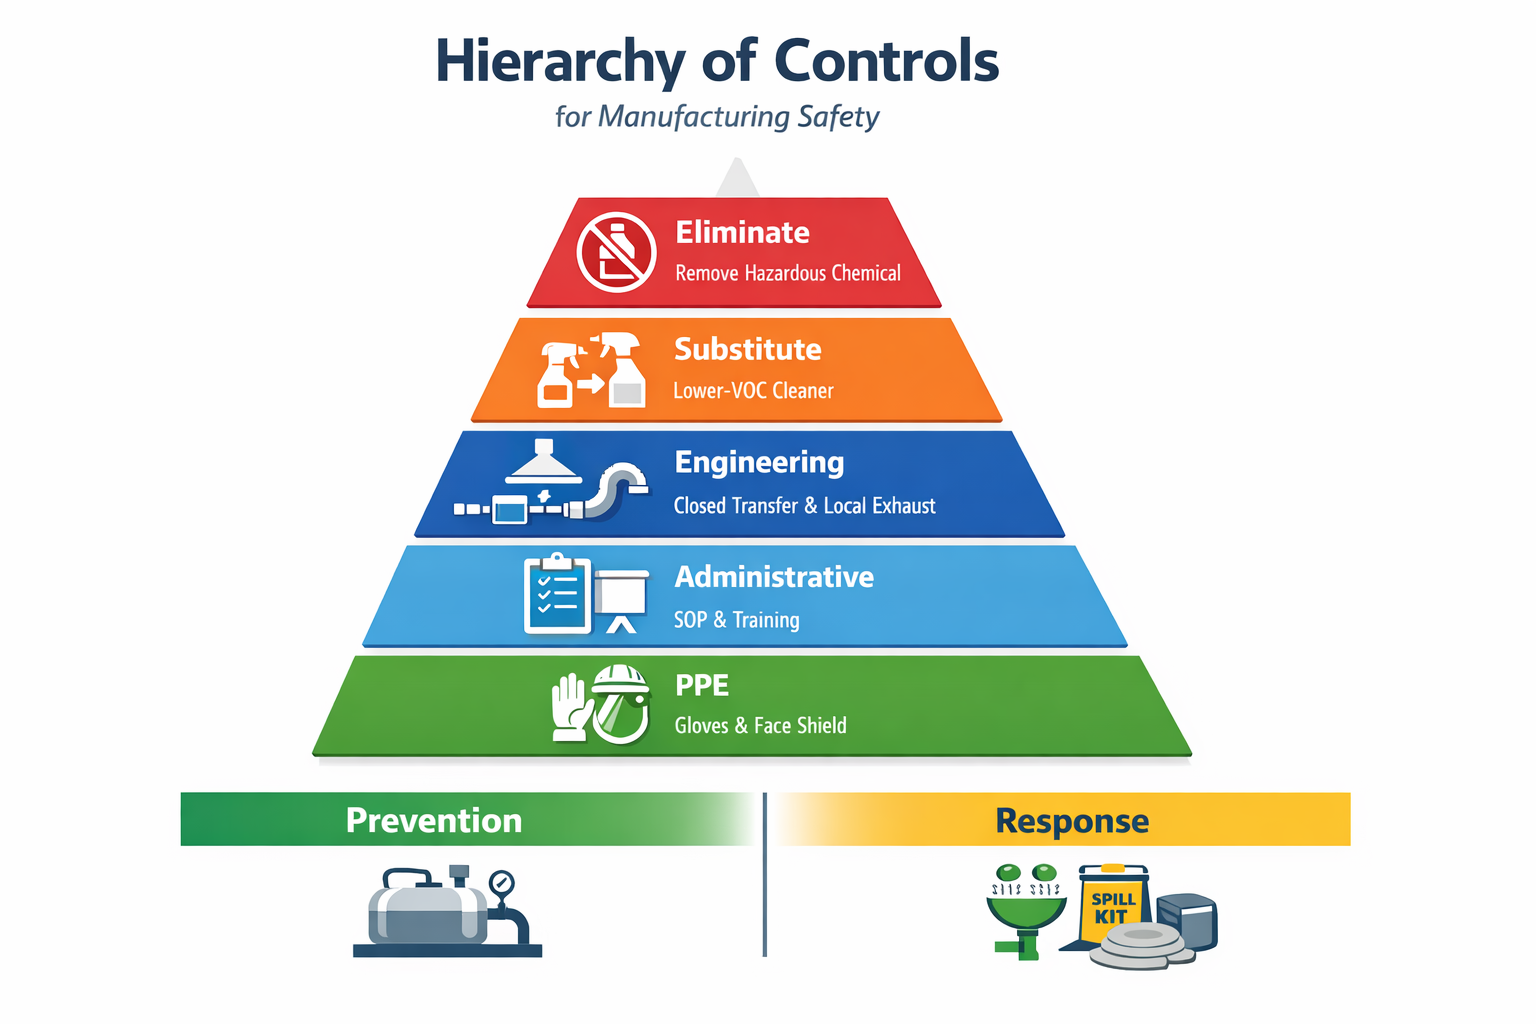
A useful rule is to separate exposure prevention from consequence reduction. Closed pumping systems, sealed containers, and compatible storage cabinets prevent vapor release and skin contact before exposure occurs. Face shields, chemical-resistant aprons, spill kits, and eyewash stations mostly reduce injury after a splash, leak, or handling error has already happened. Both matter, but they should not be treated as equal substitutes.
Control Risks In Storage Areas
In solvent storage rooms, compatibility and ventilation are the first priorities. Flammables should be separated from oxidizers, acids from alkalis, and water-reactive materials kept away from drains and wet-cleaning zones. Use clear secondary containment sized for credible spills, bonded shelving where static is a concern, and mechanical ventilation that prevents vapor accumulation. Storage inspections should verify container integrity, expiry status, legible labels, and whether the actual stock still matches the approved chemical inventory.
Reduce Exposure During Transfer And Decanting
Line-side decanting creates a different risk profile because exposure often occurs in short, repeated tasks rather than one major event. Open pouring from drums into smaller containers releases vapors and increases splash potential, so closed transfer pumps, quick-connect fittings, and fill-level controls are more effective than relying on careful hand movement alone. If smaller containers are necessary, they should be labeled immediately with product identity, hazard information, and use restrictions. This is where teams that already know how to identify chemical hazards often find missed exposure points: the task looks routine, but the transfer method is the real control gap.
Manage Leak-Prone Transfer Areas
Chemical transfer corridors, dosing skids, and hose connection points need controls built around predictable failure modes. Drip trays, leak detection, pressure checks, preventive hose replacement, and isolation valves reduce the chance that a small seal failure becomes a worker exposure event. Floor markings and restricted access help, but they are administrative support, not primary protection. Emergency showers, absorbents, and neutralizers should be positioned according to the chemicals in use and the likely spill path, not simply stored in a central cabinet.
Strengthen PPE, Training, And Response Discipline
PPE should match the chemical and the task, including glove material compatibility, breakthrough time, and splash versus vapor exposure. Training must cover normal handling, abnormal conditions, and first response, with drills for spills, overexposure, and mislabeling incidents. Review procedures after any process change, near miss, or supplier formulation change so controls stay aligned with real conditions. That is also one of the most practical links between hazard identification and daily control: once conditions change, your safeguards must change with them.
Conclusion: Turn Chemical Hazard Control Into a Digital, Audit-Ready Workflow with Jodoo
Managing chemical hazards well is not about reacting faster after an incident. It starts with accurate identification, continues with consistent risk prioritization, and depends on daily control practices that people actually follow on the shop floor. For EHS managers and chemical handlers, the real challenge is turning procedures, inspections, and response steps into a repeatable system.
That is where digitization becomes useful. With Jodoo, manufacturers can build a mobile-accessible chemical hazard management workflow without heavy custom development. Teams can maintain a digital SDS library, link each chemical container or storage area to QR-code access, and make sure operators can retrieve the right safety information at the point of use in seconds.
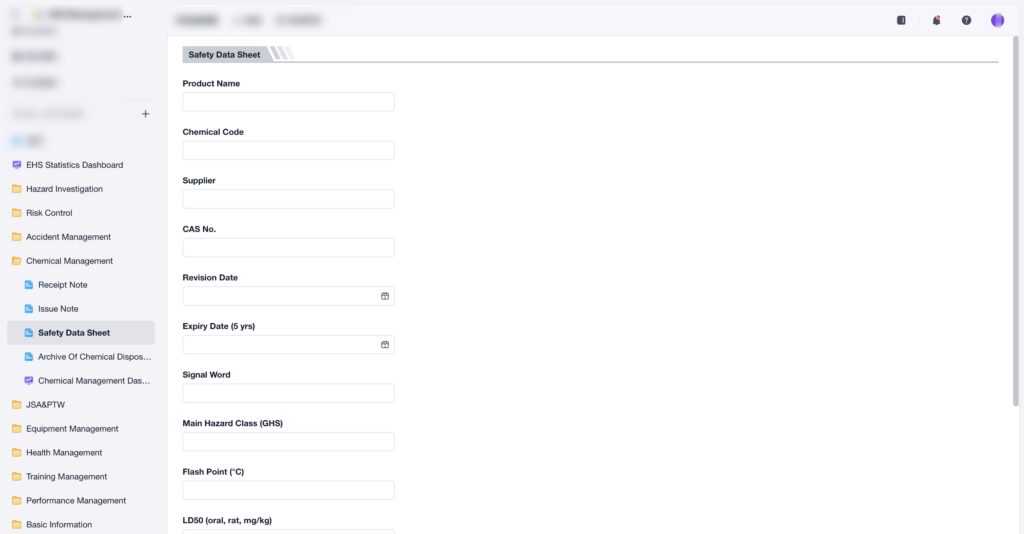
Jodoo also helps standardize execution. You can create inspection forms for chemical storage rooms, line-side chemical use points, and waste holding areas, then trigger alerts when incompatibility, poor labeling, or ventilation issues are found. If a leak, spill, or damaged container is reported, Jodoo can automatically route the issue into a maintenance work order workflow with timestamps, ownership, and audit history.
If you want safer, more traceable chemical control, start a free trial or book a demo with Jodoo.