Browse by category

Introduction: Why a Better Manufacturing Inspection Checklist Matters
A defect found at final inspection can cost 10 to 100 times more to correct than the same issue caught earlier in production. That is why an inspection checklist is not just a form for audits or customer compliance. On the shop floor, it is the practical tool quality inspectors and production managers use to spot variation, document evidence, and stop defective material from moving to the next process, assembly station, or shipment.
In discrete manufacturing, weak checklists create predictable problems: vague pass/fail language, inconsistent judgment between inspectors, missing measurements, and poor traceability when a customer complaint appears weeks later. A strong quality inspection checklist does the opposite. It translates drawings, control plans, and work instructions into clear inspection steps that can be repeated across shifts, lines, and plants.
This article explains what an effective manufacturing inspection checklist should include, how to build one step by step, and how checklist design should change across incoming, in-process, and final inspection. It also shows why digital checklists can replace paper records and spreadsheets with faster follow-up, cleaner data, and more reliable defect control.
What an Effective Inspection Checklist Includes
Identify Exactly What Is Being Inspected
A usable inspection checklist starts with traceability fields, because inspectors cannot judge quality consistently if the item itself is not clearly identified. Every form should capture the part number, product name, revision level, supplier or work order, lot or batch number, quantity inspected, date, shift, line, and inspector name. These fields link each result to a specific production context, which matters when the same defect appears only on one machine, one supplier lot, or one shift. If you are deciding what to include in a production inspection form, these identifiers are the non-negotiable first layer.
Define the Inspection Context Before the Checks
The next field group should clarify where the inspection happens and which standard applies. A checklist should state the inspection stage, such as incoming, first article, in-process, or final, plus the relevant drawing, control plan, SOP, sample limit, or customer specification. That prevents inspectors from using memory or outdated assumptions when products or tolerances change. In practice, this is one of the most overlooked parts of how to create a quality inspection checklist that different teams can use the same way.
Build Checks Around Objective Acceptance Criteria
Core inspection items should be written as measurable or observable decisions, not broad reminders. For each checkpoint, include the characteristic being inspected, the required specification, the tolerance or visual standard, the method or tool, and a pass/fail or defect code field. For example, “shaft diameter 12.00 ±0.05 mm, measured with calibrated micrometer” is actionable, while “check dimension” is not. Likewise, “no burrs over 0.2 mm on machined edge” is far stronger than “surface must be good.”
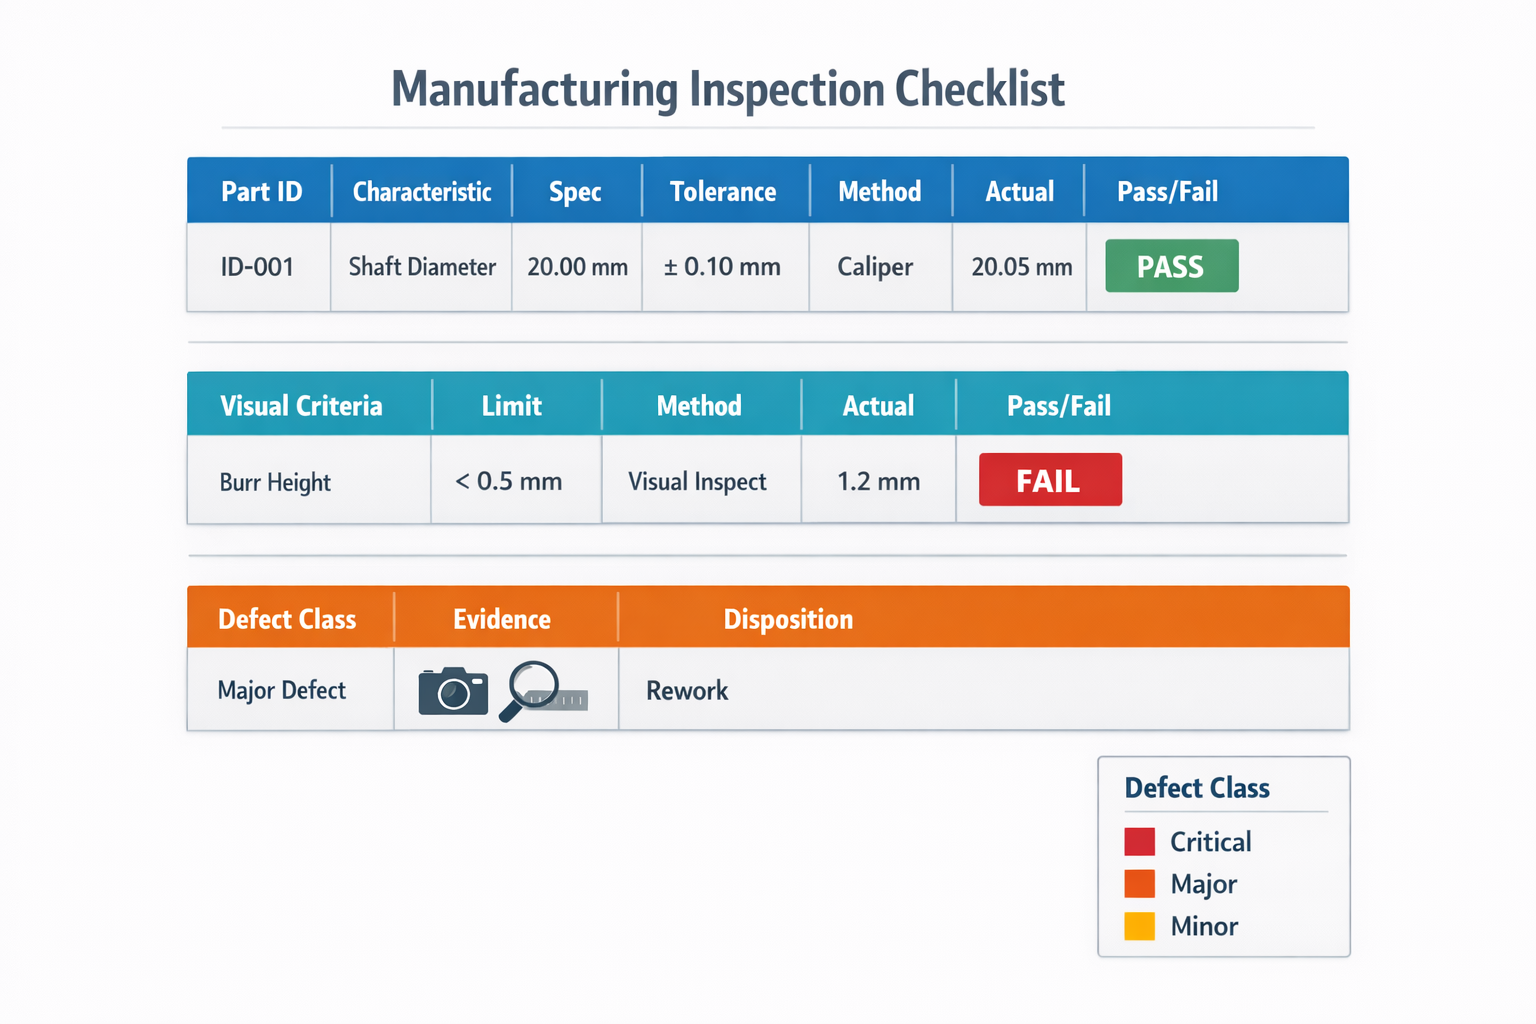
Separate Visual, Dimensional, and Defect Data
Good inspection forms also separate different types of findings instead of mixing them into one comments box. Dimensional results may need actual readings, while visual checks often need yes/no criteria tied to a defect standard such as scratch length, color deviation, solder bridging, or label position. When a nonconformance is found, the checklist should classify it as critical, major, or minor, or use your internal defect codes, so follow-up decisions stay consistent. This structure reduces the chance that two inspectors describe the same defect in different ways.
Require Evidence, Not Just a Tick Mark
An effective inspection checklist should include evidence fields that support the decision. Depending on the process, that can mean measurement values, photos, sample counts, serial numbers, instrument IDs, or short notes explaining the defect location. A packaging line, for example, may need photo proof of damaged seals, while an incoming plastics inspection may require color comparison against an approved master sample. Evidence turns the checklist from a record of opinion into a record of fact.
Finish With Clear Disposition and Sign-Off
The last section should confirm what happens next: accept, reject, hold, rework, or escalate. It should also capture reviewer or supervisor sign-off when required, especially for deviations, first-piece approval, or customer-sensitive parts. This is where the benefits of standardized inspection checklists become visible, because the same decision logic applies across lines, plants, and shifts. In short, a strong inspection checklist does not just ask whether something was checked; it shows what was checked, against which standard, with what result, and who approved the outcome.
How to Create a Quality Inspection Checklist Step by Step
Start With the Specification Stack
If you want to know how to create a quality inspection checklist, do not start with the form layout. Start with the documents that define acceptable quality: customer drawings, control plans, work instructions, approved samples, and internal defect standards. For a machined aluminum housing, that may include bore diameter tolerance, surface finish requirement, thread specification, and cosmetic limits for visible faces. This source stack tells you what to include in a production inspection form and prevents the checklist from becoming a generic list of “check dimension” tasks.
Identify the Critical Control Points
Next, map the part through the inspection stages and mark where defects can be detected early enough to matter. In the aluminum housing example, incoming inspection checks raw material grade and supplier certificate, in-process inspection checks bore diameter after CNC machining, and final inspection checks thread quality, burr removal, and appearance before packing. Focus first on characteristics tied to fit, function, safety, or recurring customer complaints. Most plants find that a short list of critical points catches more defects than a long checklist built around low-risk observations.
Define Objective Acceptance Criteria
Each checkpoint should have a clear decision rule, not a subjective reminder. Instead of writing “inspect bore quality,” write “bore diameter 25.00 ± 0.02 mm, measured with calibrated bore gauge, sample size 5 per lot.” Instead of “check appearance,” define “no dents deeper than 0.2 mm on external visible surface; no burrs on threaded opening.” The benefits of standardized inspection checklists come from this level of precision, because it reduces interpretation gaps between inspectors, shifts, and plants.
Build the Inspection Flow Around Real Work
Once the criteria are clear, arrange the checklist in the same order the inspector handles the part. That usually means identification first, then document reference, then measurements, then visual checks, then defect classification and disposition. A usable sequence for the housing might be: lot number, machine number, drawing revision, bore result, thread result, visual result, nonconformance code, containment action, inspector sign-off.
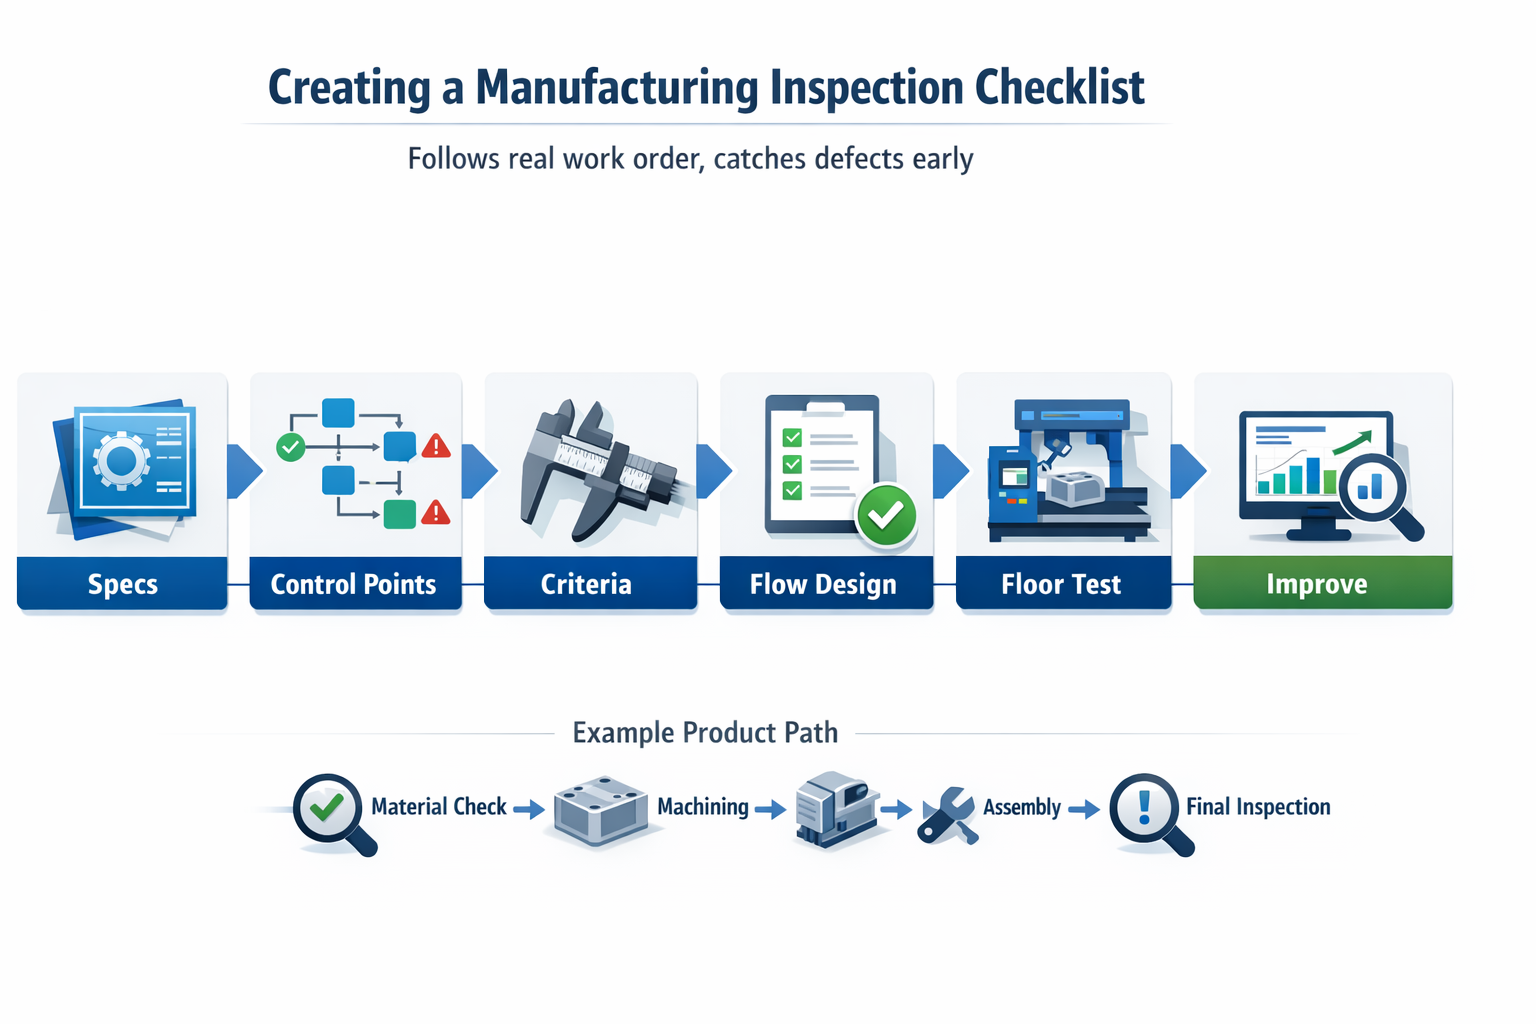
Test It on the Shop Floor Before Rollout
Before release, run the draft checklist with actual inspectors on a live lot and watch where they hesitate. If two inspectors record the same defect differently, your criteria or defect codes are still too loose. If fields are skipped, the form may be out of sequence or asking for data unavailable at that station. A short floor trial is the fastest way to refine the checklist from a document into a repeatable inspection tool.
Lock the Standard, Then Improve It With Data
After testing, freeze the version, train inspectors, and control revisions like any other quality document. Then review defect data monthly to see whether the checklist is catching the right failure modes or needs new checkpoints. This is where the benefits of standardized inspection checklists become measurable: faster training, cleaner audit trails, and more consistent defect detection across the full route from incoming to final inspection.
How Checklists Should Change Across Incoming, In-Process, and Final Inspection
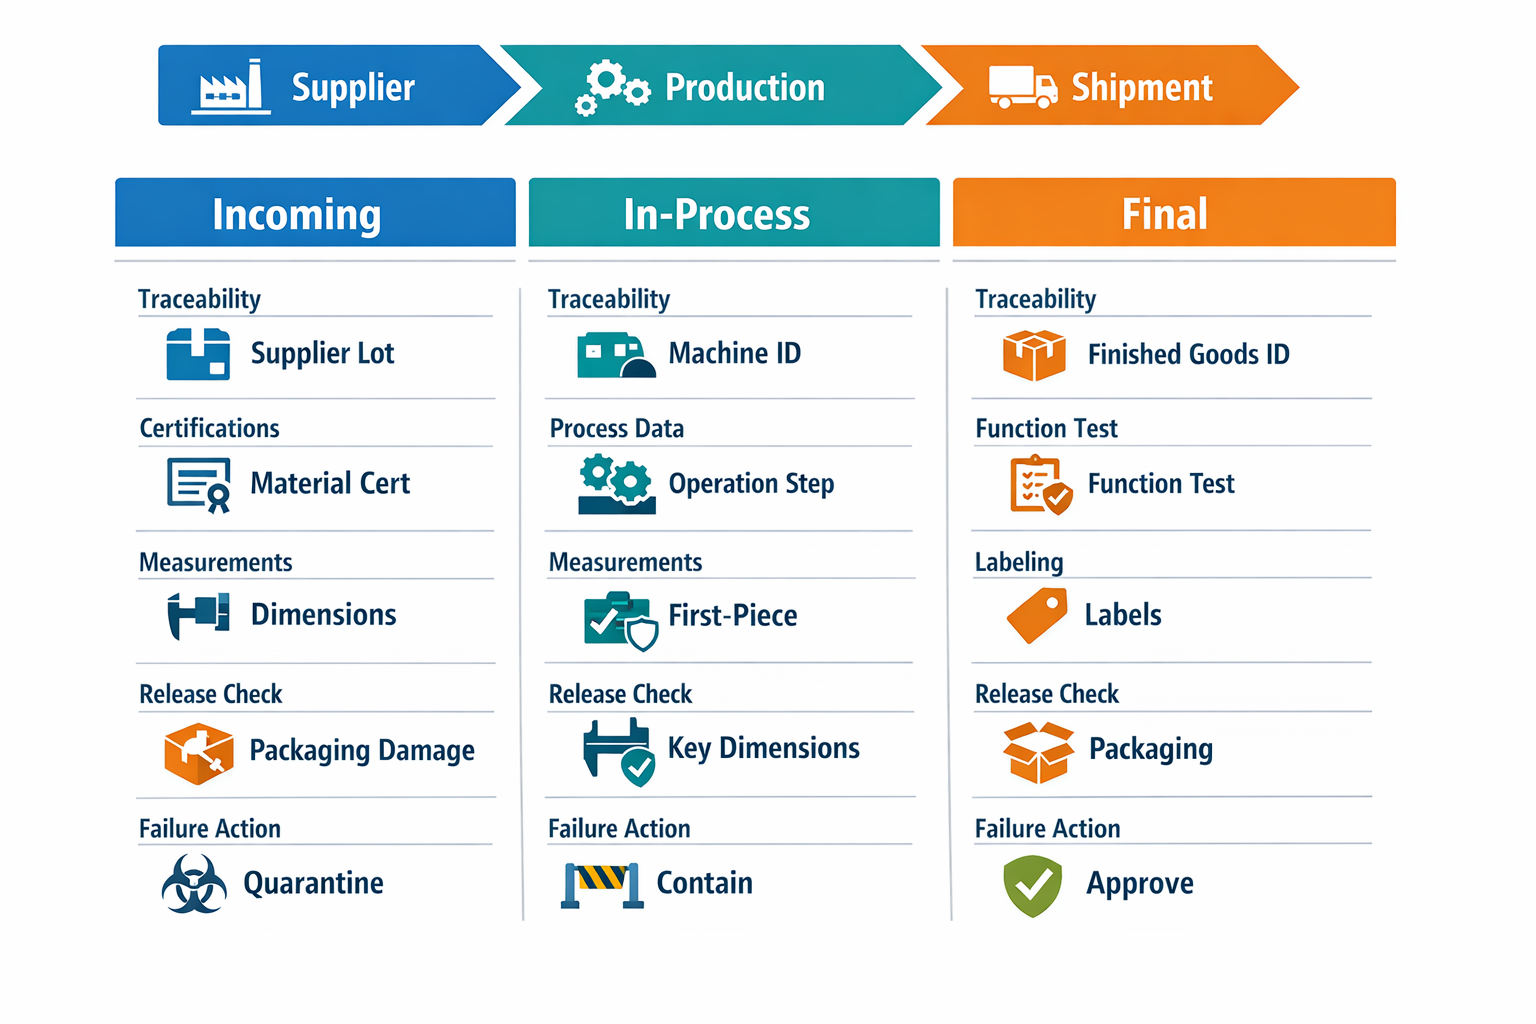
A single inspection checklist rarely works across the full manufacturing flow because each inspection point answers a different quality question. Incoming inspection asks whether purchased material is fit to enter production, in-process inspection checks whether the process is staying in control, and final inspection confirms the finished product meets release requirements. If you are deciding how to create a quality inspection checklist, start by separating these purposes before you decide the fields, tolerances, and failure triggers.
That distinction also changes what to include in a production inspection form. Incoming checks need supplier and lot traceability, in-process checks need operation context and machine or setup details, and final checks need shipment or customer-facing criteria. Standardized inspection checklists still matter at every stage, but standardization should happen within each inspection type, not across all of them with one generic form.
Incoming Inspection: Focus on Supplier Conformance
Incoming inspection is primarily about material acceptance before value is added. The checklist should capture supplier name, PO number, lot or batch number, material certificate reference, quantity received, sampling plan, dimensional or chemical requirements, packaging condition, and visible transport damage. Failure triggers are usually missing documentation, out-of-spec dimensions, wrong material grade, damaged packaging, or contamination.
For example, a metal stamping plant receiving steel coils would not use the same checklist as its final product audit. The incoming form should verify coil width, thickness, surface rust, heat number, and certificate match against the purchase specification. If any of those fail, the action is typically quarantine, supplier notification, and disposition review rather than line-side rework.
In-Process Inspection: Focus on Process Control
In-process inspection should be built around the operation where defects can still be contained quickly. The checklist usually includes work order, operation number, machine ID, tool or fixture ID, first-piece result, key process dimensions, visual checkpoints, measurement frequency, and reaction plan when drift appears. A failed result here should trigger immediate containment, setup verification, and adjustment before large quantities move forward.
A PCB assembly line is a good example. After solder paste printing, the form may check paste height, alignment offset, smear, and board cleanliness, while after reflow it may shift to solder joint appearance, tombstoning, and polarity. The benefits of standardized inspection checklists at this stage are practical: inspectors across shifts react to the same process signals in the same way.
Final Inspection and Pre-Shipment Review: Focus on Release Readiness
Final inspection confirms the product as shipped, not just the process that produced it. The checklist should include finished-goods ID, revision level, cosmetic criteria, functional test results, labeling accuracy, count verification, packaging requirements, and approval signature. Failure triggers often include incorrect labeling, failed function test, incomplete accessories, cosmetic damage beyond limit, or mismatch between order and packed product.
If you add a pre-shipment review, keep it narrow and logistics-facing. This version checks carton marks, export labels, customer-specific documents, pallet condition, and shipment quantity against the sales order. That stage-specific structure is what makes an inspection checklist usable at scale.
Why Digital Inspection Checklists Outperform Paper and Spreadsheets
Paper and Spreadsheets Break Down at the Moment of Use
On the shop floor, paper and static spreadsheet-based inspection checklists usually fail in small but costly ways. An inspector skips a field because the line is moving, uses an outdated revision printed last week, or writes a defect note that another shift cannot interpret clearly. The result is weak traceability, delayed reporting, and rework that could have been contained earlier.
Spreadsheets improve legibility, but they rarely solve workflow control. If a quality technician logs a failed bore diameter on a machined housing, the file still depends on someone noticing the entry, attaching supporting photos separately, and informing production or engineering by email or chat. That gap between defect capture and action is where many nonconformances linger longer than they should.
Digital Checklists Turn Inspection Into a Controlled Process
A digital inspection checklist does more than replace paper with a screen. It structures what to include in a production inspection form so the inspector cannot submit an incomplete record when a critical field, measurement, or evidence item is missing. That matters because even a well-designed checklist loses value if the process allows partial, late, or unverified entries.
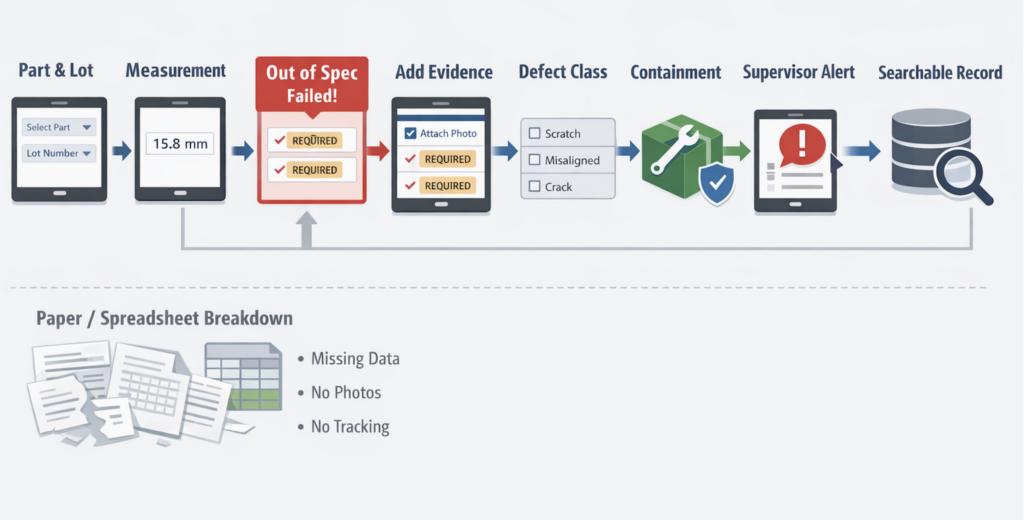
Using the same machined housing example, a digital form can require the operator to select the part number, lot, machine, inspection stage, and gauge ID before entering the failed measurement. If the bore tolerance is out of spec, the form can automatically open mandatory fields for defect classification, suspected cause, photo upload, and containment action. This is where the benefits of standardized inspection checklists become practical: every failed inspection follows the same logic, regardless of shift or inspector.
With Jodoo’s drag-and-drop form builder, quality teams can configure that logic without custom coding. You can set conditional rules so a nonconformance cannot be closed unless a defect photo, description, and escalation path are completed, then route the case automatically to a supervisor, quality engineer, or MRB reviewer. Instead of asking only how to create a quality inspection checklist, the better question becomes how to build one that drives the next action automatically.
Faster Follow-Up, Cleaner Records, Better Audits
Once the failed housing inspection is submitted, the digital workflow continues. Production receives an alert to hold the affected lot, the quality engineer gets the measurement data and images immediately, and the supervisor can review status without waiting for end-of-shift paperwork. That shortens response time and reduces the chance that suspect parts move downstream.
Digital records also make retrieval much easier during audits, customer complaints, and internal reviews. Instead of searching binders or shared folders, teams can pull inspection history by part number, supplier lot, defect type, inspector, or date range in seconds. For plants managing multiple lines or frequent engineering changes, that searchable structure is often the difference between finding patterns early and missing them until scrap costs rise.
In practice, digital checklists improve execution, not just documentation. They enforce current versions, standardize evidence capture, and connect failed inspections directly to containment and review. For production managers, that means fewer hidden defects; for inspectors, it means less paperwork and clearer decisions.
Conclusion: Build a Checklist That Catches Defects and Scales With Your Operation
A strong inspection checklist does more than document what an inspector looked at. It turns quality standards into repeatable action on the shop floor, so different inspectors, shifts, and plants can make the same pass/fail decision with less variation. In practice, the most effective checklists are clear, objective, stage-specific, and fast to complete under real production conditions.
That means using measurable acceptance criteria instead of vague wording, separating incoming, in-process, and final inspection needs, and making it easy to capture evidence when something fails. When your checklist is built this way, you reduce missed defects, shorten response time, and improve traceability for audits, customer claims, and internal corrective action. Manufacturers that standardize inspection forms typically see fewer interpretation gaps and more reliable quality data across lines.
If you are ready to move beyond paper forms and disconnected spreadsheets, Jodoo gives you a practical next step. As a no-code lean manufacturing platform, it helps quality teams build digital inspection checklists with photos, signatures, conditional logic, and workflow-based defect follow-up—without heavy IT development. You can start a free trial or book a demo to see how Jodoo can support quality control across products, lines, and plants.