
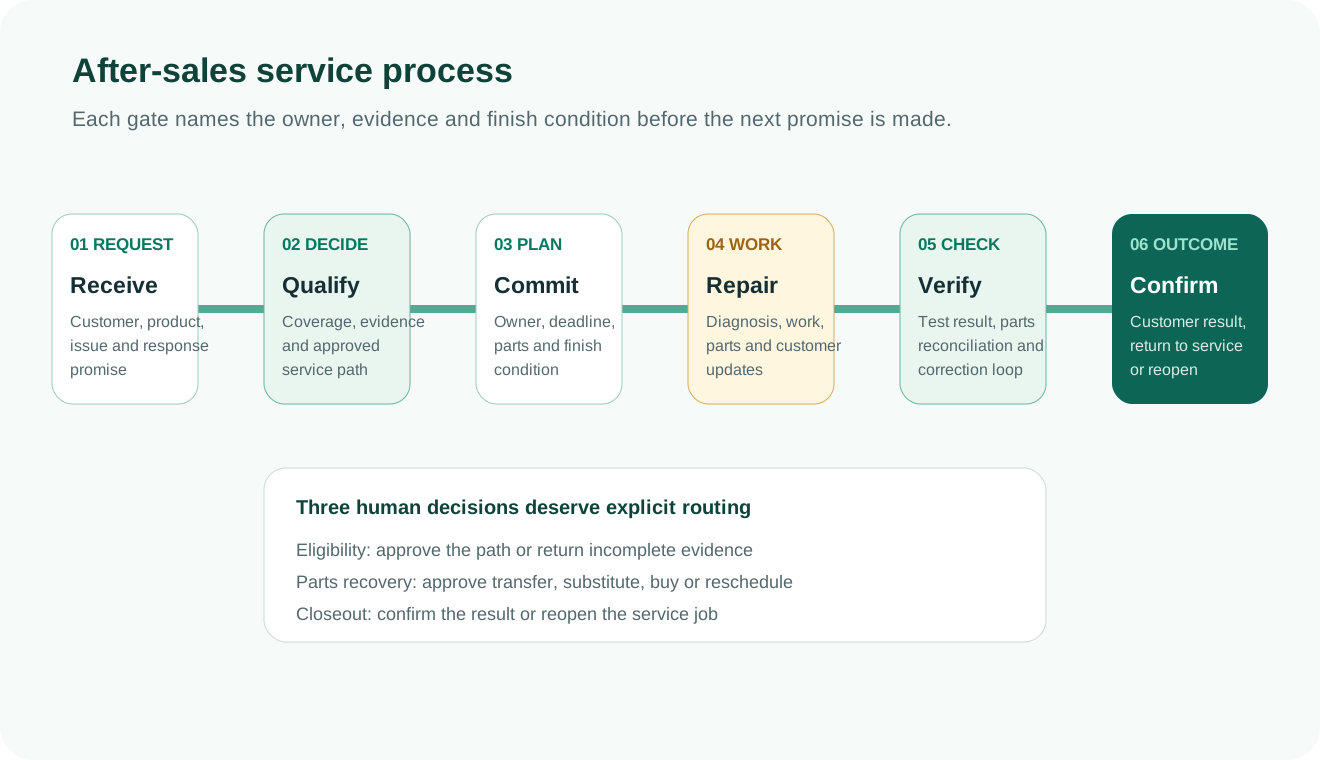


1. Capture the service need
Identify the customer, installed product, issue, operational impact, received time and promised response.
Build the process around decisions and finish conditions: who owns the first response, what proves eligibility, when parts block work and what closes the customer outcome.
Use the stages below to define ownership, evidence and finish conditions before you configure a tool or redesign a handoff.
Free for up to five users. No credit card required.
Adapt fields, workflows, and dashboards without code. Explore 1,000+ app templates and use cases
Sign in to inspect fictional sample records. Install a copy before adding customer data, production files or your own access rules.
Identify the customer, product, issue and response promise.
Confirm evidence, coverage and the approved service path.
Assign work, parts, deadlines and a finish condition.
Record diagnosis, work, parts and customer updates.
Test the result and return failed work for correction.
Reconcile parts and close only after the customer outcome is clear.
These checks are more useful than adding another generic status.
| Stage | Ready to move when | Return or escalate when |
|---|---|---|
| Intake | Product, issue, impact, owner and response promise are known | Customer or product identity is unclear, or safety impact is not assessed |
| Eligibility | Coverage evidence and approved service path are recorded | Evidence is missing or the requested path conflicts with policy |
| Work planning | Technician, finish condition, schedule and probable parts are owned | No credible completion promise can be made |
| Parts readiness | Required quantity is issued or a recovery plan is approved | Stockout, substitute or transfer has no decision owner |
| Verification | Defined operating test passes and evidence is attached | Fault remains, evidence is incomplete or rework is needed |
| Closeout | Parts are reconciled and the customer outcome is confirmed | Customer does not accept the result or the fault returns |
A stage is complete only when the next person has the facts needed to act.
Identify the customer, installed product, issue, operational impact, received time and promised response.
Confirm coverage evidence and choose the service path, ask for more information or make the work billable.
Set the owner, promised completion, service location, required evidence and verification condition.
Request, reserve and issue parts; keep used and returned quantities separate.
Approve a transfer, substitute, emergency buy or reschedule while owning the next customer update.
Confirm the repair, reconcile parts, obtain the customer response and reopen when the result does not hold.
Most service failures are not caused by a missing status field. They come from accepting weak evidence or ending ownership too early.
A visible decision avoids unapproved work and unexplained invoices.
Confirm issued quantity and arrival at the point of service.
Define the operating test, evidence and person who accepts the result.
A technically completed job can still require customer confirmation or a reopen path.
A usable process should be small enough to run next week and explicit enough to improve after the first exceptions.
Standardize installed-product context, impact, first response and next action.
Add the coverage review, service path, job owner and finish condition.
Connect job demand to allocation, substitutes, recovery and customer updates.
Add closeout evidence, reopen reasons and dashboards that lead back to records.
Review fields nobody uses, repeated exceptions and decisions that wait too long.
Connect CRM, ERP, inventory or field-service systems after deciding where each official record will be maintained.
Use the stages as a starting point, then adapt the fields, owners, decision routes and dashboards to the products and service promises you actually support.
The process remains understandable while teams adjust the fields, decisions, queues and dashboards as the service operation changes.The guide coordinates the handoffs around service; specialist systems can still own the work they are designed for.
A coordinator remains accountable while reviewers, technicians and parts teams own their stage.
Keep contact-center channels, route optimization, financial posting and advanced parts planning in the appropriate systems.
Use returned decisions, overdue updates, failed verification and reopened cases to refine the process.
A practical process covers intake, qualification and eligibility, diagnosis and work planning, parts readiness, exception recovery, verification and customer-confirmed closure.
Ownership changes by stage, but one service coordinator or case owner should remain responsible for the customer promise. Reviewers, technicians and parts coordinators own specific decisions and actions.
Warranty or contract context informs the eligibility decision. Keep detailed policy and claims administration in a warranty system when needed, but pass the approved service path into the service case.
Start with time to owned response, eligibility decision age, jobs waiting for parts, stockout recovery age, verification failure, customer-confirmation age and reopen rate.
No. Reserve formal review for decisions with material technical, customer, safety or cost impact. Routine transfers and replenishment can follow defined rules.
Review returned decisions, repeat faults, stockout causes, overdue customer updates and fields users avoid. Change the record or workflow where those patterns show preventable friction.
Follow a request through eligibility, service work, parts recovery, verification and customer-confirmed closure before adapting the workflow to your team.
Use the process workspace